It has been a while I haven’t been writing on this site. While I was introduction by a friend to use this product called Mikrotik. This product come with security and network feature that I can learn from it. As technology growth, people started to virtualize from physical to virtual as
This is my basic network using Mikrotik OS running as Virtual Router and connect it the Window Virtual Machine.
You can download the Mikrotik CD Image from the website.
Before starting installation of the Mikrotik OS, you need to edit virtual network adapter from the Virtual Network Editor.
From vmnet0, you need to bridged either to the LAN or Wireless adapter to capture the external IP address.
For vmnet1, you need to select the host-only as private network. Follow by uncheck the other 2 services:-
– “Use local DHCP service to distribute IP addresses to VM” – “Connect a host virtual adapter (vmnet1) to this network”
From the Mikrotik OS, you added the vmnet0 and vmnet1:-
For the Window OS, you only need to add vmnet1 (The Operating System has already per-installed).
Once you download the MikroTik Router OS the image and mount it from the VMware workstation. You can proceed with the installation. At the MikroTok Router Software installation page, press “a” to select all, follow by press “i” to complete it.
After the installation has completed, press “ENTER” to reboot.
The reboot process has completed, enter the user name follow by the default password from the login page.
After finish reading the software license agreement, I reset the default admin password using the command “password” to reset it.
Now move to the Window VM portion configure the MikroTik OS using winbox which is available at MikroTok website.
Open the winbox application and it will search for the available MikroTiK OS. Select it, input the user name and pass to login into the configuration.
Click to on the “Quick Set” button to configure the MikroTiK Router OS.
In the Internet portion, select “Automatic” to capture the WAN IP address. Under the “Local Network” portion, I key-in the IP address for the router, check the “DHCP Server”, input the DHCP Server Range and check “NAT“. Once completed, click “OK” and the router will reboot.
For easier identification which port is WAN and LAN, you can got to the Interface List add a remark to the port interface.
In case the DNS is not captured in the Dynamic Servers, you need to add the DNS manually under the DNS setting.
Once the Window OS received the IP address, you can start access internet.
After I had converted my Primary OS from Window Vista Bussiness Edition to Window 7 Professional. I have to re-install all the application again. One of the program that I really need to get it to work is Sonicwall VPN Client. This is very important as I VPN tunnel into my client network in order to access the our client server for some server administration.
Since I cannot down the Sonicwall VPN Client beta version from their website due to login restriction. I just have to install the Sonicwall Global VPN Client version 4.0.0.827 design for Vista.
I wasn’t able to get the VPN client to work on my Window 7 due to IPSec driver failed to load.
After doing some google search, I found a solution to resolve the IPSec driver issue
Below is the guide to configure the VPN client on Window 7:
Click on startup menu, go to accessories, right click at command prompt and select “Run as administrator”.
2. A command prompt dialog box will pop-out as administrator role. Then you type "Set DEVMGR_SHOW_NONPRESENT_DEVICES=1” and press Enter. If no error message appear, you exit from the command prompt.
3. Click on the start menu button and type “ device manager” on the search box. Device manager will appear on the search list and Enter.
4. At the device manager module, click on view at the menu and select “Show hidden devices”
5. Look for the No-Plug and Play Drivers, expand it and double click on the SonicWALL IPsec Driver.
6. At the SonicWALL IPsec Driver Properties, select the Driver tag, set the Startup Type to “Automatic” and click on the Start button at the Current status. Click OK and close the device manager.
7. Activate the SonicWall Global VPN Client either on from the All Programs menu or VPN shortcut at the desktop. You will be able to see the a pop-out dialog box to ask you to enter the user name and password once it works.
Last week, I had installed Internet Explorer 8 at my Laptop due to work requirement. After the installation, I tried to open the IE8 and realised that it took sometime to load the browser and ever open a few tags also slow.
I had done some research to solve the issue and found what the caused of the problem.
It was the Actxprxy.dll which was one of the core libraries in IE8 and not properly registered.
After re-registered the DLL and restarting my laptop, I tried using IE8 again. The result was stunning as the loading and open tag issue was resolved. 🙂
Below is the instructions:
For Window Vista /Window 7
1. Click on the start window menu, type cmd in the Star Search box.
2. Right-click the cmd short-cut that appeared at the top of the search result list.
3. Right click on the cmd short-cut and select Run as administrator.
4. A command prompt window will pop out running as administrative mode.
5. Then enter this text and press Enter:
regsvr32 actprxy.dll
6. Once it register successfully and a pop-up will be shown.
7. Restart you computer and your IE8 will work like charm.
Recently, I heard people talking about setting up a fibre channel connection between the 2 server to improve the performance of application extracting the data from the database server. The only problem to have this setup is expensive.
Due the current market, most of the company have cut their IT budget and not willing to spend money to have this setup.
Recently, my boss and I had proposed to one of our client to place their database to another server due certain reason by the other 3 party developer.
We told our client that the user will access the application server through 192.168.1.10 then it will extract the data from the database server through 10.1.1.1 to 10.1.1.2. (Figure 1)
Once our client agreed, I went to purchase a Cat 6 cross cable which support Gigabit Ethernet to 1 gigabit per second (1Gbps) at the price of S$10.00 . Plugged into the 2 gigabit network port to connect up the 2 servers and configured the application server cross connection with IP address 10.1.1.1 to the Database server with IP address 10.1.1.2. (Figure 1)
Once the connection was established and I immediately copy a 650 MB ISO to the other server. It took around 40 second to copy the ISO file over which was pretty good.
My client was happy with it as this will increase the performance of running the application to extract the data from the database server at a very low cost.
Last week, I receive a call from my client to do a new user domain account at their server. As usual I connect to their server using the Remote Desktop Connection. After I key the administrator account follow by the password and hit enter to login.
I received this logon message pop up show in figure 1 that disallow me from login remotely to the server.
Figure 1
This is weird as I am not very sure why I can’t login into the server using RDC. Then one for my colleague advice me to connect to the server remotely as console session. I did come research on it and manage find the matter use to connect to the server remotely as console using Window Vista.
For Vista:
Click on start under search, type cmd and a command prompt pop-up.
Then from the command prompt type mstsc /? (figure 2), a pop-up showing a list of command:
Figure 2
Back to the command prompt, I key in mstsc /v:server ip or server domain /admin/f and this allow me to login into the server remotely.
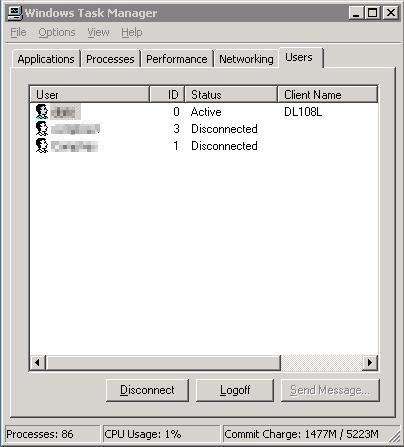
After I login into the server and I found out that they are 2 user login remote session (Figure 3) is still remain inside the server as they didn’t login log off from the remote session properly.
Figure 3
In order resolve to resolve the problem, I have to contact the person and ask them to save their stuff and log off from their account.
This is the Solid-State Drive provide manufacture by Intel. I am lucky enough get my hands on it when my colleague need to transfer his boss data to his spare laptop due to operating system crashed.
He went to Sim Lim Square to look for the USB external adapter for SSD hard drive as he want to make it as an external hard drive. In the end, he can’t get any of it from there.
The main problem that my colleague told is the power connector which is different from the rest of the USB external adapter connector. Lucky, I managed help him to transfer the data to the spare laptop using the 3 third party tools.
My colleague and I were hoping that the manufacture will come out with a USB external adapter for Solid-State Drive so that counter it if the problem occur again. Also people maybe can use it as an external hard drive if they want to use Solid-State Drive. Well, It is was a good experience to see and feel how the SSD liked.
Below are some photo taken on the Intel Solid State-Drive:


